
5 Lessons I Learned Developing FDA 510(k)-Approved Class II Medical Devices
A practical breakdown of system requirements, predicate selection, test jig development, and design controls for early-stage medical device teams.
Securing FDA 510(k) clearance for a Class II medical device is rarely a straight line. Between regulatory hurdles and the engineering effort required to bring a physical device to market, the process itself tests every aspect of your product development cycle. Reflecting on the journey from early concepts to commercial production, here are five hard-learned lessons I accumulated that can hopefully save your team time and resources.
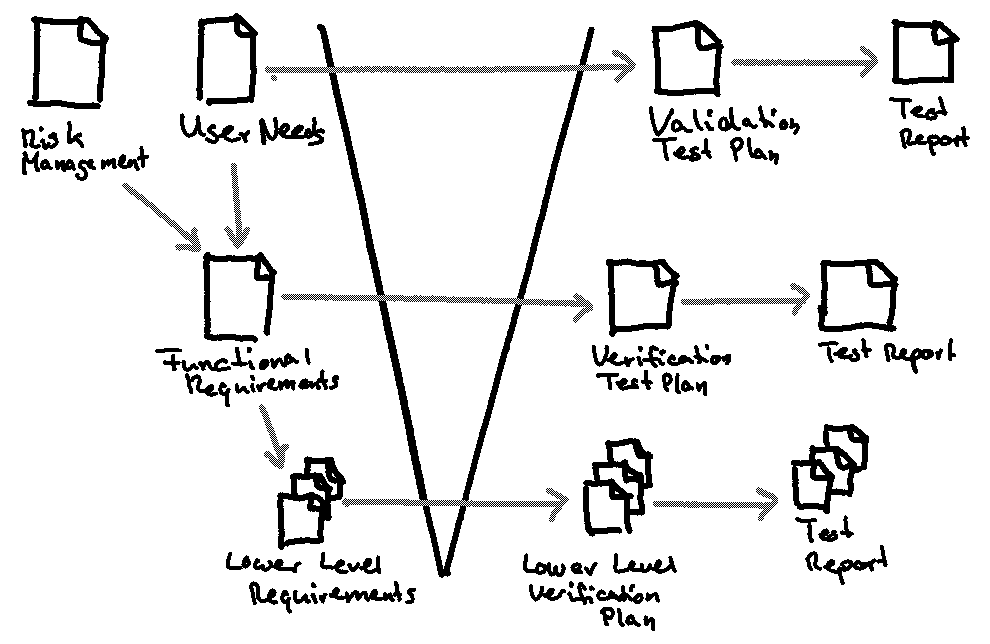
1. Write Verifiable Requirements Early
The foundation of a smooth Verification & Validation (V&V) phase is laid during Stage 0. Unclear or subjective requirements are the single biggest cause of late-stage testing bottlenecks. Think ahead & make every requirement testable by avoiding vague descriptors like 'user-friendly' or 'durable'. Where possible, I now always try to replace them with specific, measurable criteria (e.g., 'Must withstand 10,000 insertion cycles at 5N force without structural degradation').
Maintain a chain of traceability from user needs to design inputs, software/hardware specifications, and final verification protocols across the full development cycle. Depending on the scale of your team, develop mechanisms that safeguard the down-flow of information. Clear specifications ensure your test protocols write themselves, execution is unambiguous, and regulatory submission packages remain tight.
2. Build In-House Test Jigs Whenever Possible
The medical device supply chain is heavily niche, and specialized vendor costs unnecessarily reflect that status. External cycle-test houses routinely charge tens of thousands of dollars for straightforward reliability or endurance testing.
In many cases, a custom cycle-test jig built in-house costs a few hundred dollars in off-the-shelf hardware and under twelve engineering hours to program and validate. In-house test rigs give your team immediate feedback loops, allowing you to catch mechanical failures early without waiting weeks for external lab availability.
3. Use Predicate Devices & Experienced Suppliers
Reinventing the wheel in medical device design is a costly trap. The 510(k) pathway is inherently built around substantial equivalence, so leverage past learning to your full advantage. Analyze existing cleared devices not just for regulatory alignment, but to understand proven material choices, form factors, and safety mechanisms.
Instead of spending months trying to deconstruct and reverse-engineer complex subcomponents, another approach is to also collaborate with suppliers who already manufacture parts for similar cleared devices. Their existing quality systems and process validations will save you immense time. What is important is how you establish the partnership. Be very deliberate with IP ownership, manufacturability across universal suppliers, confidentiality, etc and shape it around your specific projects.
4. Master the Right Amount of Time for Documentation
Design controls—like Task Analyses and Usability Plans—are powerful tools. When executed well, they genuinely act as thought-provokers to design elegant, user-centered solutions and catch critical use errors before human factors testing. However, documentation can easily turn into an endless sinkhole if exploited or taken to unnecessary depth.
In my eyes, documents should serve the design process, not stall it. Guard against going into excessive academic depth that adds no functional value to safety or usability, and time-box early-stage planning phases so your engineering team spends their primary energy building and refining physical solutions.
5. Account for How Manufacturing Redefines the Design Process
A product that functions perfectly as an early prototype may grow into a logistical manufacturing nightmare. Early-stage prototypes are often produced using 3D printing, manual assembly, silicone molding, off-the-shelf parts, or an amalgamation of these methods. While useful for proof-of-concept testing, these methods do not always reflect real manufacturing conditions.
Once production begins, entirely new engineering challenges emerge: injection molding limitations (draft angles, wall thickness, sink marks), assembly alignment, material shrinkage, tolerance stack-up, automated manufacturing constraints, sterilization compatibility (Autoclave, EtO, Gamma), and manufacturing cost management.